Are you wondering on how to sanitize RV water tank? Did you know that sanitizing them will ensure that there will be no bacteria living in there? Get to know how you can actually sanitize your RV water tank below.
Sanitizing RV Water Tank
Unlike a tankless water heater, disinfecting a water tank for RV is an essential thing to do, and you need to do this every six months. You should make it a point to sanitize the tank and include it to the RV’s scheduled maintenance. This will ensure that the water that will come out of your water tank can safely be used for drinking, cooking, and even for bathing.
Some people think that they can just sanitize their RVs’ water tanks by asking a professional to do it. But it is always best to do this on your own, as this will ensure that you have thoroughly and perfectly cleaned the tank. You will also get to choose the tools and the cleaning chemicals that you are going to use to help sanitize the tank.
Things You’ll Need
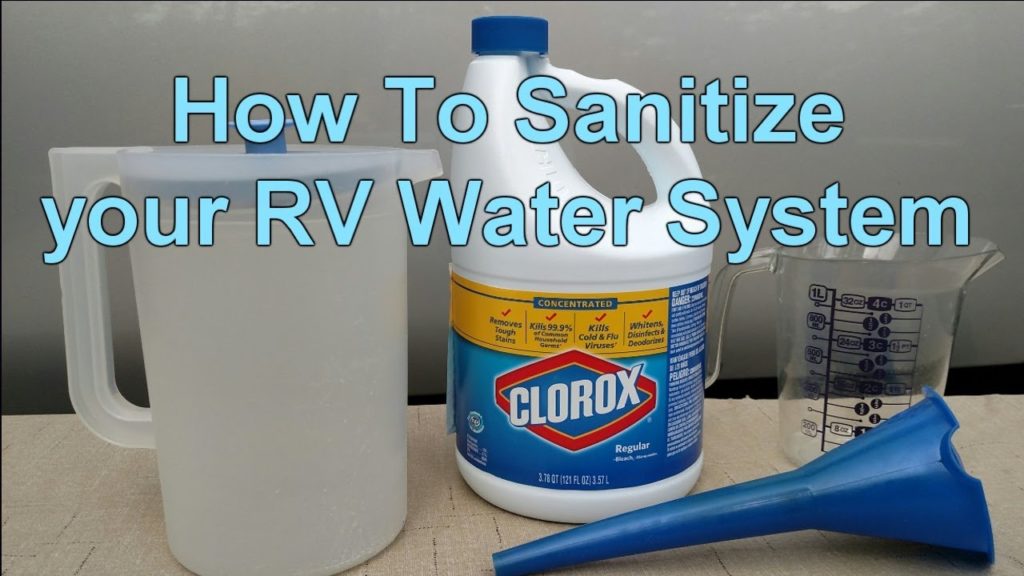
Of course, before sanitizing the tank, it would be best to start gathering everything that you need first. Here are some of the things that you’ll need, for you to clean the RV water tank effectively.
- External water filter
- Internal water filter
- Regular bleach, preferably unscented and non-gel
- Pure bleach
- Funnel with a stopper and a flexible clear hose
- Water filter wrench
- Anode
- Petroleum jelly
Tips on How to Sanitize RV Water Tank
Step #1 Sanitizing the Cleaning Tools
The first thing that you need to do is to start disinfecting the cleaning tools that you have. This includes the hose and funnel using the pure bleach. You can leave it for 15 minutes and then discard the pure bleach in the funnel. You should also pour the regular bleach using the funnel and the clear hose to the fresh water fill.
Step #2 Refilling the Water Tank
The next thing that you need to do is to start refilling the RV water tank with fresh water until it starts overflowing from the hose or until it gets full. Once full, you can turn the water supply off. You can then activate the water pump as this will help draw water from the water tank.
Step #3 Letting the Water Flow
Start opening every faucet that you have in your RV and wait until you start smelling the regular bleach. Once you start smelling it, you may turn all of the faucets off. When doing this, it would be best to shut down the power of your water heater. This will prevent burns and injuries once you start working on the faucets with your hands.
Step #4 Waiting Time
After doing step three, you can now turn the fresh water supply on. You may even add a few number of gallons to the tank if needed. Once done, then you can wait for it to start working. Typically, it would be best to wait for it least 4 hours for the water system to be fully sanitized. Some people even wait for 6 hours.
Step #5 Flushing the Water Out
After the said hours, you can turn the fresh water supply off and turn the water pump on. Once done, you can start flushing the water out of the lines by ensuring that all faucets are open. You can leave them open until there is no longer smell of regular bleach. Now, if the smell does not diminish, you can repeat steps 3 and 4.
You can also eliminate the smell by using a vinegar solution. You can create one by mixing a quart of vinegar to five gallons of water. Once done, you can repeat steps 3 and 4. For people who don’t know, vinegar can help eliminate odor and disinfect things, which makes it a perfect cleaning solution.
Step #6 Removing the External Filter
Turn the RV’s water supply off and remove the old external filter. You will need to replace it with a new filter. When doing this, you need to make sure that the pump is turned off and that the internal water filter is replaced with a new cartridge. It would also be best to dab a small amount of petroleum jelly on the filter body’s O-ring. The reason behind this is because it will make the changing of the cartridge easier the next time.
Step #7 Dealing with the Water Heater
Of course, you also need to take care of your water heater. To do this, you can turn the heater off together with the water supply to your RV. Expel any remaining pressure by opening the valve which is located on top of your water heater. Now, you can open the drain valve on your water heater. Leave it like that until all of the water insides is gone.
There will be an anode which you can inspect and replace if needed. If replacement is necessary, then do it before closing the relief and as well as the drain valve. Once done, you can turn the water supply to your RV on and refill the water heater. Before turning the power on, it would be best that all of the air is completely expelled from the heater.
These are the tips on how to sanitize RV water tank without the need of professional help. Always put in mind that cleaning the water tank is important because if you leave it unsanitized, it can cause some serious health issues not only to you but your entire family. As you all know drinking water that is contaminated can cause certain illnesses.
Drinking water that comes from a clean water tank will not only keep you and your family safe, but it will also ensure that you are not drinking something that might cause nothing but danger. So always schedule the sanitization of your RV’s water tank to avoid these problems from happening to you and your family.
For more information about RVs, you may visit my blog here.